Coding in Eclipse
Perspectives
What is a perspective?
In Eclipse, a perspective is a way to organize and view the files associated with your program. There are different perspectives available in Eclipse. The one you want to use for your projects is the “Java” perspective, which is Eclipse’s default perspective. Don’t confuse the “Java” perspective with the “Java Browsing” perspective or the “Java Type Hierarchy” perspective, as each one is different. If you want to change to a particular perspective select Window → Open Perspective, and then choose appropriate perspective.
Resetting a perspective
You may notice that certain components of the various perspectives, for example the Console window, or the Package Explorer, can be closed via the X widget in their upper right corners. What happens if you accidently close the Console, for example? How will you see what’s going on? If this happens, just reset your perspective by selecting Window → Reset Perspective and clicking “OK” when prompted to confirm. Your perspective will be restored to its original state with all of its original windows/frames.
Creating a project
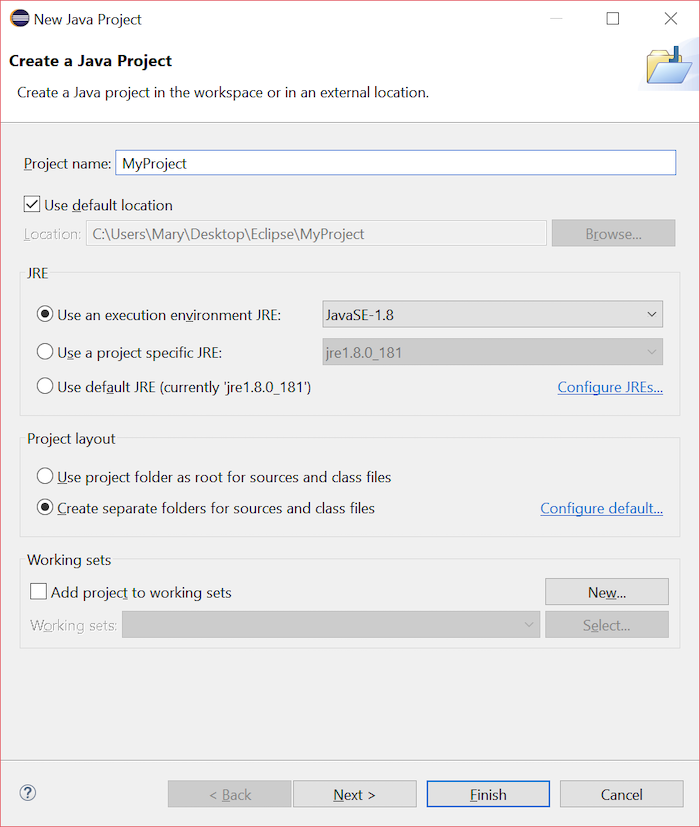
Now that you’ve got Eclipse up and running, it’s time to create your first Java project. To do this, select File → New → Java Project. After doing so, you’ll see a window like this:

The project name can be whatever you like, and it is the only value you need to provide. Your project will be created in the workspace associated with Eclipse. Click “Finish” and you will see a window like this one:

Adding a new file to a project
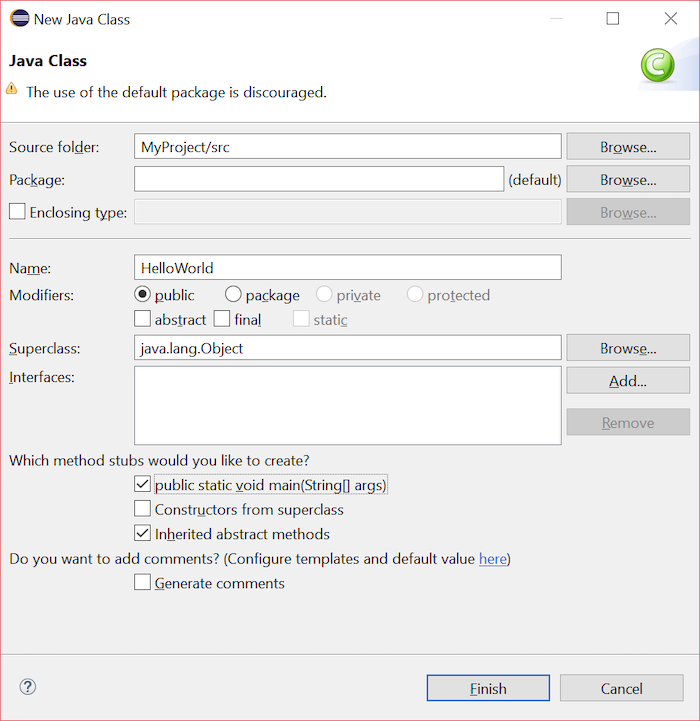
Now that you’ve created your project, you will want to create a Java file and add it to your project. A Java file is a file with the .java extension, a plaintext file in which you will write your code. To create a new Java file, right click on your project and select New → Class. You’ll see the following window:

In the “Name” field, provide the name (e.g., HelloWorld) for the file you want to create. In addition, in the section “Which method stubs would you like to create?” select public static void main(String[] args). Once you have completed your selections, click “Finish.” This is the window you will see:

You will see that a class HelloWorld with a main method has been created for you.
Saving, compiling, and running Java code
Ready to write some code? Paste the following line into your public static void main(String[] args) method, in between the { and }:
System.out.println("Hello world!");
The whole method should look like this:
public static void main(String[] args) {
    System.out.println("Hello world!");
}
In order to actually run this code, it needs to be compiled, i.e., translated into a language the computer can understand. There are different approaches we can follow; one of them is simply saving the file. In Eclipse, saving a file compiles the file for us. To save a file select File → Save.
Now that your code has been compiled, you can run your program by selecting Run → Run As → Java Application. You will be able to see the output of your program by selecting the Console tab underneath the code pane.
发表回复