分类: Eclipse Coding

  • Python Programming in the Eclipse IDE

    Python Programming in the Eclipse IDE

    Introduction This handout introduces Python programming in the Eclipse Integrated Development Environment (IDE). It is presented partly as a tutorial and partly in a “cook book” style: read the text and follow the instructions to gain some hands-on experience operating this software, which we will use extensively when we write, test, and debug our own programs. Use the resulting screen shots (checking them against what appears on your computer) to ensure that you are correctly following these instructions.

    In the sections below you will learn how to

    • Start and Stop Eclipse
    • Recognize the parts of the Eclipse Workbench
    • Test code in the Python Interpreter
    • Create a New a Project in the Eclipse Workbench
    • Enter and Edit a Script (a module that runs as a program)
    • Run a Script
    • Find and Correct Errors in a Script
    • Finish a Project
    • Use an Old/Existing/Instrutor-distributed Project in the Eclipse Workbench
  • Snapdragon Debugger for Eclipse

    Snapdragon Debugger for Eclipse

  • Installing the coding style settings in Eclipse

    Installing the coding style settings in Eclipse

    Download the eclipse-java-google-style.xml file from the http://code.google.com/p/google-styleguide/ repo. Under Window/Preferences select Java/Code Style/Formatter. Import the settings file by selecting Import.

  • Make Eclipse Faster in 5 Minutes

    Make Eclipse Faster in 5 Minutes

    Once we start working on eclipse, it gradually becomes slower. To improve the performance and make eclipse faster, there are certain ways which you can utilize and see noticeable differences. These effective method are listed below:

    1) Clean up history and indexes
    2) Remove structured text validation
    3) Do not use subclipse plugin
    4) Configure appropriate start-up arguments
    Let’s understand them in detail one by one:

    1) Clean up history and indexes
    Cleaning up history and indexes reduce the load on RAM, and overall HDD usage as well. This result in very high impact on performance. To remove the indexes and history folders, please cleanup all files/folders inside these two folders:

    For cleaning up indexes

    {workspace path}.metadata.plugins\org.eclipse.jdt.core

    For cleaning up history

    {workspace path}.metadata.plugins\org.eclipse.core.resources.history

    Here {workspace path} is the path of eclipse workspace where you create all projects.

    Please note that deleting the files from above both folders does not impact any of your project sourcecode in any way.
    2) Remove structured text validation
    This one also makes a lot of impact. Validation here is necessarily means multiple things eclipse do with your sourcecode files in background to check their validity. These are sometimes very much un-necessary and annoying too. I have worked on some projects consisting of lots of XML/XSLT and WSDL files, and some of these files always showing some red flags. But they created any problem in runtime, and in fact most of time, if was actually correct way to do things as well.

    You can turn off these validations (for all types which you feel un-necessary) and enjoy a performing eclipse.

    To turn off these text validations, open Windows > Preferences and in search bar type “validation”. It will list down all files types and applied validations on them. Disable whichever you feel un-necessary. And click OK.

    eclipse_validation

    3) Do not use subclipse plugin
    This technique is really effective but hard to follow. It says that you should use your code in eclipse only for writing/modifying and executing. All other things related to SVN/perforce or any code repository should be done outside eclipse. This can be from a command line tool or any visual client.

    Subversion plugin uses too much system resources and effects eclipse performance badly.

    Even if you really want to use it, then checkout only certain part of code through subclipse, and rest of code import as external project. It will also help you.

    4) Configure appropriate start-up arguments
    In your eclipse.ini file (inside eclipse installation folder) change the default -Xms40m -Xmx256m arguments as per your needs. This option defines the minimum and maximum memory usage bounds which are passed to java virtual memory to manage eclipse application’s memory allocation tolerance. You should not set them to maximum available because you need other softwares to run in parallel.

    You should try different combinations of -Xms and -Xmx options, and then decide which one works for you best and make eclipse fastest.

    A sample config looks like this:

    -startup
    plugins/org.eclipse.equinox.launcher_1.3.0.v20120522-1813.jar
    –launcher.library
    plugins/org.eclipse.equinox.launcher.win32.win32.x86_1.1.200.v20120522-1813
    -product
    org.eclipse.epp.package.jee.product
    –launcher.defaultAction
    openFile
    –launcher.XXMaxPermSize
    256M
    -showsplash
    org.eclipse.platform
    –launcher.XXMaxPermSize
    256m
    –launcher.defaultAction
    openFile
    -vmargs
    -Dosgi.requiredJavaVersion=1.5
    -Dhelp.lucene.tokenizer=standard
    -Xms256m
    -Xmx1024m

    Bonus Tip: Use -Xverify:none, -Xquickstart and -server OR -client in eclipse.ini
    -Xquickstart
    You can use -Xquickstart for initial compilation at a lower optimization level than in default mode. Later, depending on sampling results, you can recompile to the level of the initial compile in default mode. Use -Xquickstart for applications where early moderate speed is more important than long run throughput. In some debug scenarios, test harnesses and short-running tools, you can improve startup time between 15-20%.

    -Xverify:none
    You can use -Xverify:none if you want to skip the class verification stage during class loading . Using -Xverify:none disables Java class verification, which can provide a 10-15% improvement in startup time. However corrupted or invalid class data is not detected when this option is specified. If corrupt class data is loaded, the Java Virtual Machine (JVM) might behave in an unexpected manner, or the JVM might fail. But this can only happen, when you are making byte code modifications youself.

    -server | -client
    Java HotSpot Technology in the Sun-based Java Development Kit (JDK) Version 1.4.2 introduces an adaptive JVM containing algorithms for optimizing byte code execution over time. The JVM runs in two modes, -server and -client. If you use the default -client mode, there will be a faster start-up time and a smaller memory footprint, but lower extended performance. You can enhance performance by using -server mode if a sufficient amount of time is allowed for the HotSpot JVM to warm up by performing continuous execution of byte code. In most cases, use -server mode, which produces more efficient run-time execution over extended periods. You can monitor the process size and the server startup time to check the difference between -client and -server.

    That’s it for now. If you know any technique other than above listed ones, please share with us.
  • Programming with PHP in Eclipse

    Programming with PHP in Eclipse

    PHP is an open source general-purpose scripting language that is great for web development and can be embedded into HTML. PHP is mainly used in three areas: server-side scripting, command line scripting, and desktop applications. If you would like to include PHP in Eclipse, CodeMix provides all the tooling you need, from coding support to debugging.

    CodeMix is an Eclipse plugin that provides core PHP support, plus the option to add Code-compatible extensions directly into Eclipse—install any number of popular PHP extensions to further enhance your PHP coding experience. CodeMix is compatible with Eclipse-based IDEs and tools like MyEclipse, Spring Tools Suite, and JBoss Tools, so you can continue working in the environment you are accustomed to.

  • Getting Started with Eclipse IDE

    Getting Started with Eclipse IDE

    This tutorials walks us through creating a simple Hello World application using Eclipse IDE

    Setting up the environment
    First of all, you need the Eclipse IDE installed on your system. You can download its latest version from download page. The “Eclipse IDE for Java Developers” bundle is recommended.

    To add the Kotlin support to your Eclipse IDE, install the Kotlin Plugin for Eclipse. We recommend installing the Kotlin plugin from Eclipse Marketplace. One option is to drag this button into a running Eclipse window:

    Drag to your running Eclipse workspace.

    Alternatively, open the Help | Eclipse Marketplace… menu and search for Kotlin Plugin for Eclipse:

    Eclipse Marketplace

    A more old-fashioned way is using an update site directly:

    Once the plugin is installed and Eclipse is restarted, make sure the plugin is installed correctly: open the Kotlin perspective in the menu Window | Open Perspective | Other…

    Kotlin Perspective

    Creating a new project
    Now you are ready to create a new Kotlin project.

    Select File | New | Kotlin Project.

    New Kotlin Project

    An empty Kotlin/JVM project will be created. For Eclipse IDE, the project is also a Java project but configured with Kotlin nature, meaning it has the Kotlin Builder and reference to the Kotlin Runtime Library. Great thing about this solution is that you can add both Kotlin and Java code to the same project.

    The project structure looks like this:

    Empty Kotlin Project

    Create a new Kotlin file in the the source directory.

    New File From Context Menu

    You can enter the name without the .kt extension. Eclipse will add it automatically.

    New Kotlin File Wizard

    Once you have a source file, add the main function – the entry point to a Kotlin application. You can simply type main and invoke code completion by hitting Ctrl + Space.

    Main Template

    Add a simple line of Kotlin code to print a message:

    Hello World Example

    Running the application
    To run the application, right-click somewhere in the main file and select Run As | Kotlin Application.

    Run Kotlin Application

    If everything went well, you’ll see the result in the Console window.

    Program Output View

    Congratulations! You now have your Kotlin application running in Eclipse IDE.

  • Eclipse – Create Java Project

    Eclipse – Create Java Project

    Opening the New Java Project wizard

    The New Java Project wizard can be used to create a new java project. There are many ways to open this wizard −

    • By clicking on the File menu and choosing New →Java Project.
    • By right clicking anywhere in the Project Explorer and selecting New → Java Project.
    • By clicking on the New button (New Button ) in the Tool bar and selecting Java Project.

    Using the New Java Project wizard

    The New Java Project Wizard has two pages. On the first page −

    • Enter the Project Name
    • Select the Java Runtime Environment (JRE) or leave it at the default
    • Select the Project Layout which determines whether there would be a separate folder for the source codes and class files. The recommended option is to create separate folders for sources and class files.

    You can click on the Finish button to create the project or click on the Next button to change the java build settings.

    On the second page you can change the Java Build Settings like setting the Project dependency (if there are multiple projects) and adding additional jar files to the build path.

    Viewing the Newly Created Project

    The package explorer shows the newly created Java project. The icon that represents a Project is decorated with a J to show that it is a Java Project. The folder icon is decorated to show that it is a java source folder.

  • Refactoring using Eclipse

    Refactoring using Eclipse

    Renaming a class that is used widely throughout a project could take a lot of time but the Eclipse refactoring wizard makes the job easier by automatically detecting all dependencies on the class being renamed and modifying them also.

    The refactor menu can be opened by −

    • Right clicking on a Java element in the Package Explorer view and selecting Refactor menu item.
    • Right clicking on a Java element in the Java editor and selecting Refactor menu item.
    • Selecting a Java element in either the Package Explorer view or Java Editor and clicking Shift + Alt + T.

    The refactor menu shows all the possible changes that are supported on the selected Java element. To rename a class, select the Rename menu item.

    Click on the Next button to see a preview of the changes (if available). Then click on Finish to get the wizard to do its work.

  • Coding in Eclipse

    Coding in Eclipse

    Perspectives

    What is a perspective?

    In Eclipse, a perspective is a way to organize and view the files associated with your program. There are different perspectives available in Eclipse. The one you want to use for your projects is the “Java” perspective, which is Eclipse’s default perspective. Don’t confuse the “Java” perspective with the “Java Browsing” perspective or the “Java Type Hierarchy” perspective, as each one is different. If you want to change to a particular perspective select Window → Open Perspective, and then choose appropriate perspective.

    Resetting a perspective

    You may notice that certain components of the various perspectives, for example the Console window, or the Package Explorer, can be closed via the X widget in their upper right corners. What happens if you accidently close the Console, for example? How will you see what’s going on? If this happens, just reset your perspective by selecting Window → Reset Perspective and clicking “OK” when prompted to confirm. Your perspective will be restored to its original state with all of its original windows/frames.

    Creating a project

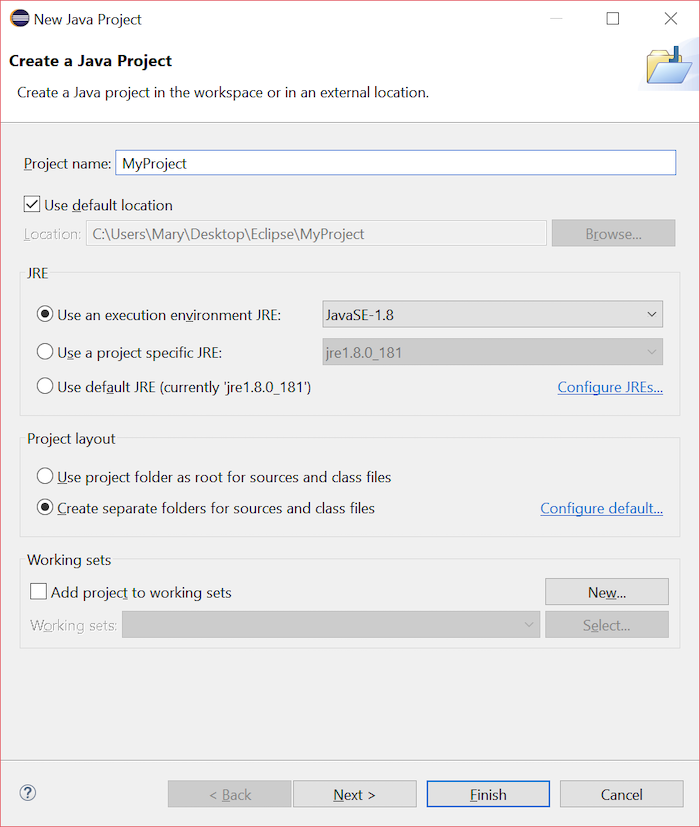
    Now that you’ve got Eclipse up and running, it’s time to create your first Java project. To do this, select File → New → Java Project. After doing so, you’ll see a window like this:

    New Java Project dialog

    The project name can be whatever you like, and it is the only value you need to provide. Your project will be created in the workspace associated with Eclipse. Click “Finish” and you will see a window like this one:

    workspace window with new project

    Adding a new file to a project

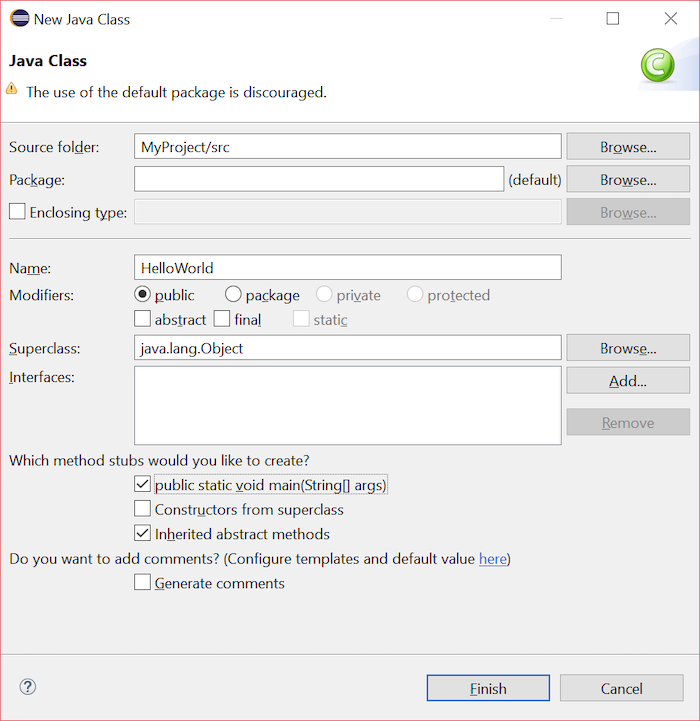
    Now that you’ve created your project, you will want to create a Java file and add it to your project. A Java file is a file with the .java extension, a plaintext file in which you will write your code. To create a new Java file, right click on your project and select New → Class. You’ll see the following window:

    New Java Class dialog

    In the “Name” field, provide the name (e.g., HelloWorld) for the file you want to create. In addition, in the section “Which method stubs would you like to create?” select public static void main(String[] args). Once you have completed your selections, click “Finish.” This is the window you will see:

    workspace with new Java file

    You will see that a class HelloWorld with a main method has been created for you.

    Saving, compiling, and running Java code

    Ready to write some code? Paste the following line into your public static void main(String[] args) method, in between the { and }:

    System.out.println("Hello world!");

    The whole method should look like this:

    public static void main(String[] args) {
        System.out.println("Hello world!");
    }

    In order to actually run this code, it needs to be compiled, i.e., translated into a language the computer can understand. There are different approaches we can follow; one of them is simply saving the file. In Eclipse, saving a file compiles the file for us. To save a file select File → Save.

    Now that your code has been compiled, you can run your program by selecting Run → Run As → Java Application. You will be able to see the output of your program by selecting the Console tab underneath the code pane.

  • Eclipse JEE 网页中中文乱码问题

    Eclipse JEE 网页中中文乱码问题

    1.请求和响应的编码设置为UTF-8

    主要是以下两句代码

    // 请求设置编码为UTF-8
    request.setCharacterEncoding(“utf-8”);
    // 响应设置为UTF-8
    response.setContentType(“text/html; charset=utf-8”);
    // 注意注意!!!!!,设置编码一定要写在取数据和获得响应输出流前面,如下面两句的前面
    String name = request.getParameter(“name”);
    PrintWriter out = response.getWriter();

    2.设置JSP的编码


    这几个地方的编码改成UTF-8的。

    重点重点!!!每次都改很麻烦,最好的方法是在IDE中去设置一下。如Eclipse。

    设置步骤:windows->preferences->web->JSP Files->设置为UIF-8就好。


    3.修改Tomcat的编码为UTF-8

    打开Tomcat中conf目录下的server.xml文件、找到Connector节点,加上URIEncoding=”UTF-8″,如下图


    这三个处理完了,基本上就不会有乱码的问题了。