分类: Eclipse Coding

  • Using the Workbench & Perspectives

    The workbench refers to what you see when you load your IDE. It typically contains a perspective which is a layout of related views and editors. You can select one or more perspectives to open in the Workbench based on the type of development you are doing.

    The ability to customize your workbench is available in MyEclipse and Angular IDE.

    Perspectives

    The perspective you choose determines what you see in your workbench. You can select a predefined perspective or customize a perspective to your particular needs. 
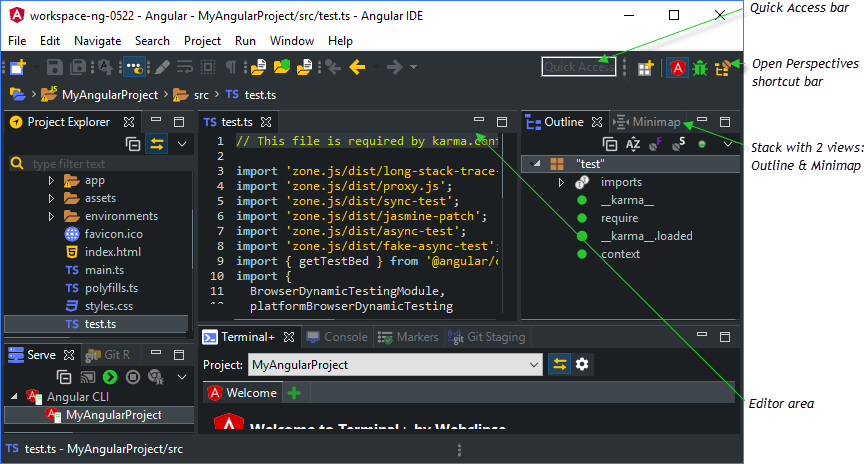

    Example of workbench displaying views associated with the Angular perspective

    Opening a Perspective

    Use any of the following methods open a perspective:

    • Click the  Open Perspective button on the Open Perspectives shortcut bar.
    • Select a perspective from the Window>Perspective>Open Perspective menu.
    • Type the perspective name into the Quick Access bar.

    The name of the active perspective is displayed in the title of the window and the corresponding icon is highlighted on the Open Perspectives shortcut bar.

    Note: To switch between multiple open perspectives, click the icon on the Open Perspectives shortcut bar.

    Perspective Layout

    A perspective consists of one or more views and an editor area with one or more open editors. 

    Views

    A view is an area of the workbench that typically displays a hierarchy of information you can navigate, displays properties associated with the active editor or allows you to open an editor. Multiple views located in the same area appear stacked in a tabbed notebook. To activate a view that is part of a stack or tabbed notebook, click its tab. Actions performed in a view are immediately reflected in the workbench and do not need to be saved.

    • Showing Views
      To show a view, select the view from the Window>Show View menu. The menu lists the views associated with the current perspective, or select Other to see additional views sorted by category. The active view appears with the title bar highlighted.


      Selecting a view

      Note: Only one instance of any given view is open in a workbench page.
    • Closing Views
      To close views, click the close icon on the tab or right-click on the tab to access a context menu with options for closing tabs in the stack.


      View context menu
    • View Options
      Click the down arrow in the title bar to display a menu with options that apply to all items in the view, as opposed to a specific item.


      View drop down menu

    Editors

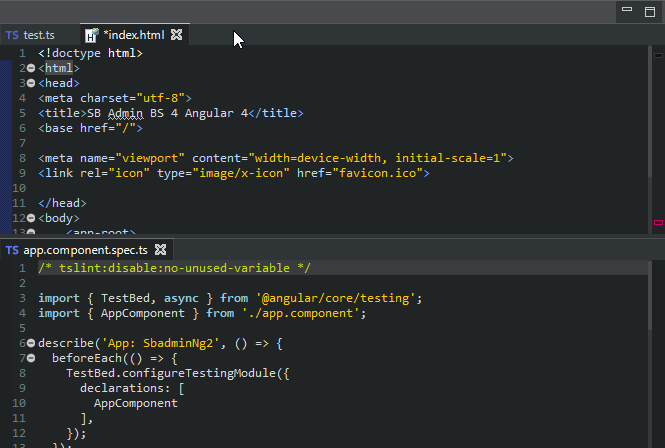
    The Editor area of the workbench displays one or more editors used to view and edit resources. Each tabbed page in the Editor area is an individual editor. Editors are usually launched by clicking a resource in a view. Press Ctrl+S to save changes made in an editor. Unsaved files are denoted with an asterisk in front of the file name on the tab. 
    cfeditorstack


    Editor area with multiple editors open

    Personalizing Perspectives

    You can save your own personalized views including preferences for the layout of views and editors within the perspective as well as customization of perspective details.

    Saving a perspective

    If you want to save your modifications to a perspective for future use, select Window>Perspective>Save Perspective As.

    Rearranging views

    You can arrange the views and editors using multiple methods.

    Note: To reset the perspective to the default, select Window>Perspective>Reset Perspective.

    • Moving a view
      Click in the title bar of a view and drag it to the new location. An outline appears indicating the area, also known as the stack, where the view will appear. Release the mouse button to complete the move. You can also drag a window outside of the workbench to view it independently from the workbench.
    • Reordering tabs
      Click in the title bar of the tab and drag the tab to the new position.
    • Minimizing and Maximizing
      Click the buttons provided on a stack’s border. You can also double-click a stack’s title bar or press Ctrl+M to toggle the state. When you maximize a view stack or editor area, all other stacks are minimized.

      Note: When a stack is minimized, the stack icons are moved to the trim stacks (the narrow areas on the outer edges of the window). Click the Restore button to return the stack to the original state or click an icon in the trim stack to open a view in the stack. When a stack is maximized the other stacks are minimized. When restoring a maximized view, only trim stacks created during the initial maximize are restored. Stacks that were individually minimized, remain in the trim stack.


      Minimizing and maximizing views

    Customizing Perspectives

    To make changes to what appears for a selected perspective, choose Window>Perspective >Customize Perspective from the menu and select each item to appear in the current perspective. Click through each tab to customize the following items: 

    • Toolbar Visibility—Including icons and drop-down menu items.
    • Menu Visibility—Including menus and available menu options.
    • Action Set Availability—Including menu bar and toolbar details.
    • Shortcuts
  • Creating a MyEclipse IDE Package

    Creating team-tailored installation packages gives you better control over team MyEclipse environments, providing standardization and simplified delivery of required tool stacks. Choose software, add-on components, security and access policies, workspace configuration defaults, etc that are best for each team. When you first generate a package, many of these settings are defaulted for you. In this tutorial, you will learn how to:

    • Create a basic MyEclipse package
    1. In the Secure Packages list in the Admin Console navigation, click MyEclipse Secure Packages.


      Creating a MyEclipse IDE package
    2. In the Packages section, click  to add a new package, or  to duplicate an existing package, i.e. use an existing package as a template for a new one.
    3. If you have more than one MyEclipse product available, choose the product on which to base the package, and click Next.


      Choosing the MyEclipse product based on installed packs and license
    4. Enter a title for the package. This title will be displayed on the portal web page. Choose one or more delivery groups for the package. If no groups are selected, the package appears on the portal home page, if using the default access policy. Click Next.


      Naming the new package
    5. Select the components you want installed with the software, and click Next. Your choice determines the add-ons that are preselected. You have the opportunity later to customize your choice on the Software tab.


      Selecting components to include in the installer

    The Package Details page opens to the Overview tab. The status of capabilities that can be defined for the package displays in the Capabilities section. The first four are set up by default. You can tailor these to fit your needs by clicking the Configuration tab or the corresponding items in the Admin Console navigation. You can also view usage metrics for this package.


    Package overview

    At this point, the package is created with default access, environment, and security policies.

  • Licensing and Activating MyEclipse

    1. Trying MyEclipse for Free

    You can download and try out all MyEclipse features for 30 days without a subscription. To start your MyEclipse trial, provide us with your email address so we can keep you informed, and we’ll send you a Quick Reference Guide to help you get going with MyEclipse. You can use MyEclipse for 7 days without providing trial registration information.

    register-trial


    MyEclipse trial registration

    2. Registering MyEclipse for Use

    This document describes all aspects of the MyEclipse software subscription model. To obtain a MyEclipse software subscription, you must be a registered user on Genuitec.com  Visit New User Registration if you are not already registered.

    Note: Procedures for licensing and subscription are different when using MyEclipse Secure. With MyEclipse Secure, license and activation are automated; therefore, MyEclipse users are not required to work with licensing.

    3. Obtaining a Subscription

    To purchase a MyEclipse subscription, visit the Genuitec Portal. You must log in using your Member ID (UserName) and password created at registration to purchase a subscription. Once logged in, choose the payment option that suits your needs, and follow the on-screen instructions to complete the process. Upon completion, your account status is upgraded accordingly, and you receive an email confirming your payment. A few minutes later, you also receive an email containing a 12-month subscription access key for the Enterprise Workbench. The key disables reminder and trial windows and allows unlimited access to new releases and upgrades for the same period.

    4. Acquiring and Installing the License

    After you purchase the subscription, you receive a notification email that your subscription has been processed. This email provides your subscription id and subscription code required to activate your subscription.

    This email is very important because it contains your subscription code and links to key portal services for subscribed users. After you receive your notification email, you can install the subscription code into MyEclipse to fully activate the workbench and suppress any expiry warnings. To enter the subscription information do the following:

    1. Start MyEclipse.
    2. Select Help>Subscription Information  from the menu.
      Note: Subscription information can also be updated from Window>Preferences>MyEclipse>Subscription>Enter Subscription.


      Update Subscription window
    3. Copy the Subscriber ID from the email you received, and paste it into the Subscriber ID field exactly as provided.
    4. Copy the Subscription Code from the email, and paste it into the Subscription code field with no leading or extra spaces. The subscription details appear in the Validation area if you entered the information correctly, and you are ready to activate your license.


      Ready to activate
    5. Click Close, or Enable Now to begin activation (described in the following section).

    5. Activating Your License

    After entering your subscription ID and code, you can activate your license immediately. However, if you need to wait for some reason, such as your internet connection is unavailable, you have 5 days before activation is required.

    If you have entered your subscription ID and code but have not yet activated your license, MyEclipse displays a reminder shortly after startup.


    Activation options

    5.1 Automatic Activation

    The easiest and recommended activation method is automated activation. You are required to have an internet connection on the machine running MyEclipse.

    1. Select Help>Subscription Information   from the menu.
    2. Click Enable Now.
      Note: If you need to postpone activation for some reason, click Activate Later. You can do this for 5 days.


      Activation options
    3. With Automated activation selected, click Activate Now.
    4. Enter your email address, or to opt out, click Skip Email, and click Activate Now.


      Email opt-in
    5. When activation completes, click Close on the Activation Successful window.


      Activation success

    5.2 Web (Manual) Activation

    Web activation is an alternative to automated activation. This allows you to perform the activation process manually, performing the activation from a web browser. You can use this method to activate if the machine running MyEclipse does not have internet access.

    1. Select Help>Subscription Information   from the menu.
    2. Click Enable Now.
      Note: If you need to postpone activation for some reason, click Activate Later. You can do this for 5 days.
    3. Select the Web activation option, and click Activate Now.


      Selecting web activation
    4. Enter your email address, or to opt out, click Skip Email, and click Activate Now.


      Email opt-in
    5. To manually activate using the browser, click Open in Browser. If you need to activate from another machine with internet access, click Copy URL, paste it into a text file for transfer to another machine. From there, open the URL in a browser.


      URL for retrieving activation code
    6. Click Activate on the web page displayed. The License Code and System ID Code fields are already filled in for you.
    7. On the resulting page, click Copy to Clipboard to copy the activation code presented. If you are on a different machine than the one on which you are activating MyEclipse, you must transfer this code back to the MyEclipse machine.
    8. In MyEclipse, click Enter Code, and paste the copied code into the Activation Code field.


      Entering activation code retrieved from activation URL
    9. Click Activate Now.When activation completes, click Close on the Activation Successful window.


      Activation success

    If the Web activation process occurs on another machine, as described in step 5 above, it might not be possible to perform the entire web activation process in one session. In this case, ensure the activation code displayed on the web page is saved for later use. When you open MyEclipse, start the activation process again. On the first screen of the wizard, select the “I already have an activation code” option. This displays the activation code entry window, as shown in step 8.

    6. Viewing Subscription Details

    There are two methods for viewing your subscription information — the Update Subscription window as shown above, or the Subscription preference page. Open the subscription preferences by selecting Window>Preferences from the menu. Expand MyEclipse, and choose Subscription from the preferences list.

    In addition to providing your subscription information, you can use the preference page to enter new subscription information, to purchase a new subscription, or renew an existing one. Click Enter Subscription to launch the Update Subscription window. Click Purchase Subscription to open an external browser to the MyEclipse Payment Options page.

    subscription


    Subscription Preference page

    7. License Usage and Restrictions

    The following lists outlines the proper use and restrictions of your MyEclipse subscription license:

    • The single-user license enables the user to operate up to 2 instances of MyEclipse Enterprise Workbench on the same development machine at a time, in order to support debugging scenarios. Additionally, we recognize that developers often have both a workstation and a laptop that they use for development so the developer may also use the same license on up to three machines provided that the developer is the sole user of these machines and that none of the MyEclipse instances are in use simultaneously.
    • If a user has more than 1 development machine, it is okay to install the same license into two MyEclipse installations.  However, you may only operate MyEclipse on 1 development machine at any given time subject to the restrictions of #1.
    • The single-user license is to be used only by the owner of the subscription. No other users are allowed to use your subscription key. Low cost group licenses are available for multi-user environments.
    • A group key can be used by up to the specified number of users in a group subscription.
    • A group key is not a floating user key. The number of licenses in the group key should match the number of developers using MyEclipse over an extended period of time. For example, 20 users can not share a 15 user key. Buyers should plan to purchase the number of licenses to match the number of developers.

    8. FAQ

    I have forgotten my password to Genuitec.com. How do I retrieve it? 

    1. Go to the Genuitec.com login page, and click the Lost your password? link.
    2. Provide your UserName or email, and click Reset Password.  You will receive an email containing a link to reset your password.
    3. Enter a new password, and click Save.

    I lost my subscription information to enable MyEclipse Enterprise Workbench. How can I get this information?

    1. Log into Genuitec.com.
    2. Click Products in the menu, and then click MyAccount.
    3. Select the My Licenses link.
    4. Click the Resend Key link. You will receive a copy of the original email notification that includes the access key.

    Sometimes MyEclipse Enterprise Workbench loses my subscription information and forces me to reenter it. What causes this?

    If you install a new Eclipse instance or version or you add a new workspace, you must re-enter your subscription information.

  • After angular CLI upgrade webclipse server fails with: “Server failed to start”

    After angular CLI upgrade webclipse server fails with: “Server failed to start”.
    Currently running webclips angular plugin version: 1.10.0.201808081726
    After upgrading my projects to the following versions:
    Angular CLI: 6.1.2
    Node: 10.1.0
    OS: win32 x64
    Angular: 6.0.2

    When starting the server associated with the project I get the following error:
    TypeError: Class extends value undefined is not a constructor or null
    at patchServeCommand (C:Userswilliamseclipse-workspacedevice-guinode_modulesangular-ideaddoncommandsserve.js:76:52)
    at Object.<anonymous> (C:Userswilliamseclipse-workspacedevice-guinode_modulesangular-idebinng:40:7)
    at Module._compile (internal/modules/cjs/loader.js:678:30)
    at Object.Module._extensions..js (internal/modules/cjs/loader.js:689:10)
    at Module.load (internal/modules/cjs/loader.js:589:32)
    at tryModuleLoad (internal/modules/cjs/loader.js:528:12)
    at Function.Module._load (internal/modules/cjs/loader.js:520:3)
    at Function.Module.runMain (internal/modules/cjs/loader.js:719:10)
    at startup (internal/bootstrap/node.js:228:19)
    at bootstrapNodeJSCore (internal/bootstrap/node.js:576:3)

    Please help me get my environment running on the latest angular cli.

    ——

    Sorry we missed this earlier. You may need to update the angular-ide module for full Angular 6 support. In a Terminal+ session for the project, enter the command:

    npm update angular-ide

    If that doesn’t fix the issue, please let us know the eclipse version, the full Webclipse version (from Preferences->Webclipse) and the npm version for the project (from the project Properties/CLI Tool Management page), to make sure we can try to replicate your environment. Also, if possible, attach your package.json file and the eclipse error log, which can be exported from the Error Log view.

    Sorry again for the late reply.


  • This is on CodeMix 3 Release CI 2019.9.25 and Eclipse Oxygen 3a release 4.7.3a

    Steps to produce:

    Open eclipse workspace
    Click on obj3.js file in Project explorer to open in Javascript::Codemix editor
    Click on Eclipse menu File > Save As …
    Enter file name obj4.js and click ok
    Receive “Resource “/breakHier/combine/obj4.js” does not exist

    In the Linux shell the file also is not visible and has not been created.

    As a side effect of this error now some .js files become uneditable in the sense that the editor pane, which already was open before this error occurred, does not react to nay key presses any more. Also, in these edit panes do not show highlighting any more. The side effect vanishes after an Eclipse restart.

    This is on CodeMix 3 Release CI 2019.9.25 and Eclipse Oxygen 3a release 4.7.3a

    Currently it renders Codemix unusable for any larger edit tasks…

    Uhh. Ohh. Ooooooh.

    There seems to be more broken with the save file feature.

    When I edit a file, the file is unsaved and I move the file in the project explorer into a different directory I get all kinds of weird effects.

    Ok. I understand that a file which is unsaved and open for edit should not be moved (and, actually, I would be perfectly happy receiving a message that I should first close that file, similar as most editors I know do).

    However what happens is: The system permits and executes the move (according to the view seen in the project explorer) but then the editor content behaves completely weird. It looks like the content consists of two different parts, one which shows but cannot be edited (ie. the cursor jumps around, as if this uneditable content would not exist, nevertheless it shows up in the view, albeit in a different color). Upon save then only one content portion is saved and the rest is JUSt GONE. As in “oops, nice that you worked on that file for 1/2 hour but the stuff is now GONE. Sorry.”

    During the move the editor content was not yet completely syntactically correct .js but just some text fragments. Maybe this is an aspect here.

    An hour ago I unexpectedly lost some 300 lines of code that way. Since I am usually not that dumb to produce such effects by mere accident, I did a bit of testing and can pretty much more or less reproduce this effect reliably. Steps are:

    1) doubleclick on an existing .js file with some content in project explorer
    2) edit file a bit
    3) move file in project explorer to different directory
    4) continue editing (you will see incorrect cursor behavior)
    5) click on save icon of eclipse, everything looks fine
    6) close editor panel with click into X symbol
    7) doubleclick on file in project explorer (at new location)
    8) observe that considerable parts of the edit is missing

    I am not aware to which extent this effect happens in ALL scenarios, since I am currently working in a fresh project directory which already
    consists of some 3, 4 directories with some 3, 4 files each and the problem showed up only now. As “save as” (see above post) and moving files around is part of my usual workflow, I am a bit astonished that I did not notice such behavior earlier. There might some other aspect in my workflow which might have triggered that and here I can only guess. I did a chmod 755 in the shell for one or two files to enable a babel-node she-bang (but did an explorer refresh and even eclipse restart since)

    However, the problem now shows up quite consistently and reproducibly.

    Of course I cannot tolerate unexpected loss of edited code and thus I am throwing CodeMix off my eclipse for now until getting some indication that this got fixed or addressed somewho.

    ——

    First – good news, we’re putting out a release in the next couple of days which should have both these issues fixed. We were due to release today, but have pushed the release out to ensure these fixes are correctly made, tested, and included in the release.

    On to the actual issues you raised:

    We did not have move protection built into the product, something we somehow overlooked. Without the protection in, nothing could really be expected to work correctly once the file was moved, which would explain all the issues you see (from bad highlighting, to unexpected cursor behavior). Like regular Eclipse editors, you will now be prevented from making unsafe changes if there are unsaved changes in your editors.

    Unfortunately, Save As had a regression in a recent release as part of some other optimizations, and as it was stable for so long, we missed it in our regression suite – it has now been added to our automated tests.

    Sorry you had a negative experience in areas that we completely agree should be rock solid. Especially appreciate you taking the time to send in your feedback, despite uninstalling CodeMix, at least for now.

    The release from a couple of days ago includes fixes for Save-As and Move (we’re going to make move a bit more flexible in upcoming versions). We’ve also exposed the CA on trigger checkbox so you can basically make all those settings without having to go to the settings.json file.

  • Cant run the project terminal crashes with the following message

    > Executing task in folder /Users/channa/Documents/Angularrorkspace2/aifo: node_modules/angular-ide/bin
    /ng serve –port=4200 –live-reload=true –webclipse-launch-id=8132920727081824392 <

    env: node: No such file or directory
    The terminal process terminated with exit code: 127

    Press any key to close the terminal.

    ——

    Sorry that you are seeing this issue.

    1. Can you please type this command : node –version in the Terminal+ for the project and let us know if the node version is displayed?
    2. Are you seeing the issue only with this particular project or you cannot run any Angular projects in that workspace?
    3. Is this project created using our tools or did you import it from elsewhere?
    4. Which OS are you working with? Please check if this is the issue you are encountering w.r.t Node if you are working with Debian/Ubuntu : https://github.com/nodejs/node-v0.x-archive/issues/3911

    Apologies for inconvenience caused.

  • Is Android development definitively dead on Eclipse?

    As title.

    I know that Google stopped the “official support” to ADT for Eclispe but is Android development definitively dead on Eclipse?

    I can’t believe that there is no way to develop on Eclipse anymore.

    Is there some plan to add this support “on the genuitec side” inside MyEclipse?
    It could be awesome for Eclipse users to return to Eclipse for Android development.

    ——

    I know, it’s sad, but to the best of my knowledge, you can’t develop native Android applications with Eclipse anymore.

    At Genuitec, MyEclipse has included a couple of Mobile app development solutions, but unfortunately they had to be discontinued

    What you should still be able to do with Eclipse, is hybrid application development, the above link has some tips.

    Hope this helps!

  • SSL handshake error after upgrade WAS 9.0.0.7 to 9.0.5.1

    I’m using the following MyEclipse Version

    Version: CI 2019.4.0
    Build id: 16.0.0-20190403

    and it works together with a Websphere traditional server version 9.0.0.7.

    But since I’ve upgraded the application server to version 9.0.5.1 the status of the server is not updated and I find lots of SSL handshake errors in the server log.

    I tried switching fomr IPC to SOAP protocol without luck. And I tried to change the SSL settings within the WAS under “Security > SSL certificate and key management > SSL configurations > NodeDefaultSSLSettings > Quality of protection.” But I didn’t found a working setting.

    Do you guys have any hint about this?

    ——

    I believe you’re hitting a known issue with WAS 9.0.5 and above. We’ve got this fixed for an upcoming MyEclipse release, but you can follow these steps to apply the fix immediately.

    1) Shut down MyEclipse
    2) Download this updated plugin which has the fix.
    3) In your MyEclipse installation’s plugins folder, you will find a file with the same name. Make a backup of this file, and replace it with the file downloaded.
    4) Start MyEclipse.

  • EJB2 Issue – with bundle location

    User is getting the following error:
    Caused by: java.lang.ClassNotFoundException: Cannot load “

    com.genuitec.eclipse.blue.ejbdeploy.was8.EJBDeployService” because the bundle “file:/C:/HighmarkApps/Genuitec/MEB2016/plugins/com.genuitec.eclipse.blue.ejbdeploy_13.0.0.me201602031002/plugins/com.genuitec.eclipse.blue.ejbdeploy.was8_3.6.50.jar” cannot be resolved.
    at org.eclipse.osgi.framework.internal.core.BundleHost.loadClass(BundleHost.java:230)
    at org.eclipse.osgi.framework.internal.core.AbstractBundle.loadClass(AbstractBundle.java:1197)
    at com.genuitec.eclipse.blue.ejbdeploy.Loader.<init>(Loader.java:164)
    … 9 more

    He has the specific jar (com.genuitec.eclipse.blue.ejbdeploy.was8_3.6.50.jar) in the corect location and it contains the specific class however it still canot find it?


    ——

    Thank you for the log file – we’ve been able to replicate this problem with WAS 8.5 and MyEclipse 2016 locally.

    We spent a day looking at whether we would be able to deliver a patch for 2016. Unfortunately, as support for WAS 8.5 was just introduced in 2016, it has other WAS 8.5 bugs as well, making it impossible to deliver a patch that will allow you to reliably work with WAS 8.5 – sorry!

    Our recommendation is for you to use MyEclipse 2019.04 instead, with an additional patch to fix a Java 11 + EJBDeploy issue (fix will be a part of the next MyEclipse release being currently worked on). Here are the steps you will need to take:

    1) Install MyEclipse 2019.04.
    2) Download http://downloads.genuitec.com/downloads/partners/misc/ejbdeploy_fix.zip
    3) Ensure MyEclipse is not running.
    4) In the plugins folder of your installation, you should find a folder named: com.genuitec.eclipse.blue.ejbdeploy_13.0.0.me201805280638. Move this folder elsewhere as a backup.
    5) Unzip the zip into the plugins folder, it will create a folder of the same name – com.genuitec.eclipse.blue.ejbdeploy_13.0.0.me201805280638
    6) Start MyEclipse.

    We realize this can be quite a change for the user, but I’m afraid it’s the only solution we have until the next release of MyEclipse. Please let us know if this works for you or if you have any concerns.

  • Illegal reflective access in MyEclipse component

    My SOAP service stopped working again. It seems if I wait a few months, something, the Java version, or something else will have changed and I have to basically start over (“Create a Web Service Project, …). I’m not sure why, but SOAP services seem extremely brittle.

    This morning, trying to run the formerly-working SOAP service just gave ma a screen full of errors (again).

    Here are some ones that apply to some illegal accesses that could be causing the errors — see below

    Have these been resolved in recent builds?

    Thanks,

    —-

    Trying to run the client….

    WARNING: An illegal reflective access operation has occurred
    WARNING: Illegal reflective access by com.sun.xml.bind.v2.runtime.reflect.opt.Injector$1 (file:/Applications/MyEclipse%20CI/MyEclipse%20CI.app/Contents/Profile/plugins/com.genuitec.eclipse.ws.xfire_13.0.0.me201812061423/lib/webservices-rt.jar) to method java.lang.ClassLoader.defineClass(java.lang.String,byte[],int,int)
    WARNING: Please consider reporting this to the maintainers of com.sun.xml.bind.v2.runtime.reflect.opt.Injector$1
    WARNING: Use –illegal-access=warn to enable warnings of further illegal reflective access operations
    WARNING: All illegal access operations will be denied in a future release

    =====

    Trying to do a Maven build of the formerly-working project, gave me these errors:

    WARNING: An illegal reflective access operation has occurred
    WARNING: Illegal reflective access by com.sun.xml.bind.v2.runtime.reflect.opt.Injector$1 (file:/Applications/MyEclipse%20CI/MyEclipse%20CI.app/Contents/Profile/plugins/com.genuitec.eclipse.ws.xfire_13.0.0.me201812061423/lib/webservices-rt.jar) to method java.lang.ClassLoader.defineClass(java.lang.String,byte[],int,int)
    WARNING: Please consider reporting this to the maintainers of com.sun.xml.bind.v2.runtime.reflect.opt.Injector$1
    WARNING: Use –illegal-access=warn to enable warnings of further illegal reflective access operations
    WARNING: All illegal access operations will be denied in a future release

    ******

    Java of late has been making some changes that are breaking some older applications, starting with Java 9. The issues you are seeing appears to be related to restricted access to internal APIs, something that would affect older versions of JAXB (part of the web services JAR). This is not something MyEclipse has much control over.

    Unless you specifically need to move to a newer version of Java, the most expedient solution would be to not try and re-create the webservices, but checking the Java version you’re running with and going back to an earlier version. Just keep your existing code and change the version of Java it is running with.

    As far as the JAXB issue itself is concerned, it looks like we’ll have to update the generation wizards in MyEclipse to create projects with more recent versions of the libraries which support Java 11+.